A dark stair run changes the way people move before they even notice it. They slow down, reach for a rail, and guess where the next tread begins. A good staircase lighting installation fixes that hesitation by showing each step edge, the landing, and the direction of travel without turning your yard into a parking lot. For U.S. homeowners, the goal is simple: make the stairs safer at night, easier to use in rain, and better looking from the patio or driveway. If you already collect ideas from a trusted home improvement planning guide, treat lighting as part of the stair design, not as decoration added at the end. The best results usually come from warm, shielded fixtures placed low enough to guide your feet and soft enough to protect the evening mood. Start with safety. Then shape the glow.
Staircase Lighting Installation That Starts With Safe Design
Outdoor steps fail people in small ways first. One shadow hides a tread lip. One bright fixture points into someone’s eyes. One loose wire gets buried under mulch and forgotten until the first freeze-thaw cycle opens the gap. Before you pick a fixture style, map how people use the stairs on an ordinary Tuesday night, not during a staged backyard photo. That simple walk-through tells you where light must land.
How exterior stair lights should shape each tread
The safest light is often the least dramatic one. You do not need a bright beam across the whole staircase. You need clear contrast at the tread edge, enough glow on the landing, and no glare aimed at the eyes of someone walking up.
The International Residential Code says exterior stairways need an artificial light source at the top landing, which is a useful baseline for homeowners checking local expectations. Many cities and counties add their own rules, so your permit office has the final word. Still, that top-landing idea matters because it lights the first decision point: where the stair begins.
A practical setup might use one downlight near the door, two low wall lights along a masonry stair, and a small marker light near the lower landing. That is not fancy. It works because it tells the foot what comes next.
Why glare is more dangerous than dimness
Here is the part many homeowners miss: brighter can make stairs harder to read. A bare bulb beside a step throws a sharp shadow behind the tread nose, and the eye struggles to separate the safe walking surface from the drop. That problem gets worse for older adults, guests wearing glasses, and anyone carrying groceries.
Shielded exterior stair lights solve this by pushing light down and sideways instead of outward. If you can see the glowing bulb from the bottom of the stair, the fixture is probably too exposed. The light source should disappear while the step edge stays clear.
Walk the stair after dark and look from both directions. If one fixture makes you squint, move it, shield it, dim it, or change the beam angle. The test is not whether the fixture looks good on the wall. The test is whether your foot trusts the next step.
Choosing Fixtures That Survive Weather and Foot Traffic
Once the safety pattern is clear, fixture choice gets easier. Outdoor stairs punish weak products. Rain hits them sideways. Snow sits against them. Yard tools bump them. Kids kick them without meaning to. The right fixture is not the prettiest box on the shelf; it is the one that keeps working after three seasons of dirt, water, heat, and vibration.
Where low voltage step lights make sense
Low voltage step lights are a strong fit for many residential stair projects because they run from a transformer and are common in landscape systems. They are often used on deck risers, retaining walls, stone cheek walls, and stair borders where a soft pool of light can mark each level.
The transformer still needs proper placement and power. Outdoor receptacles should be weather-resistant and GFCI-protected where required by code, and the transformer should be rated for outdoor use. If a fixture or cable will sit in a wet location, do not trust “outdoor style” wording. Look for actual wet-location or outdoor ratings from the maker.
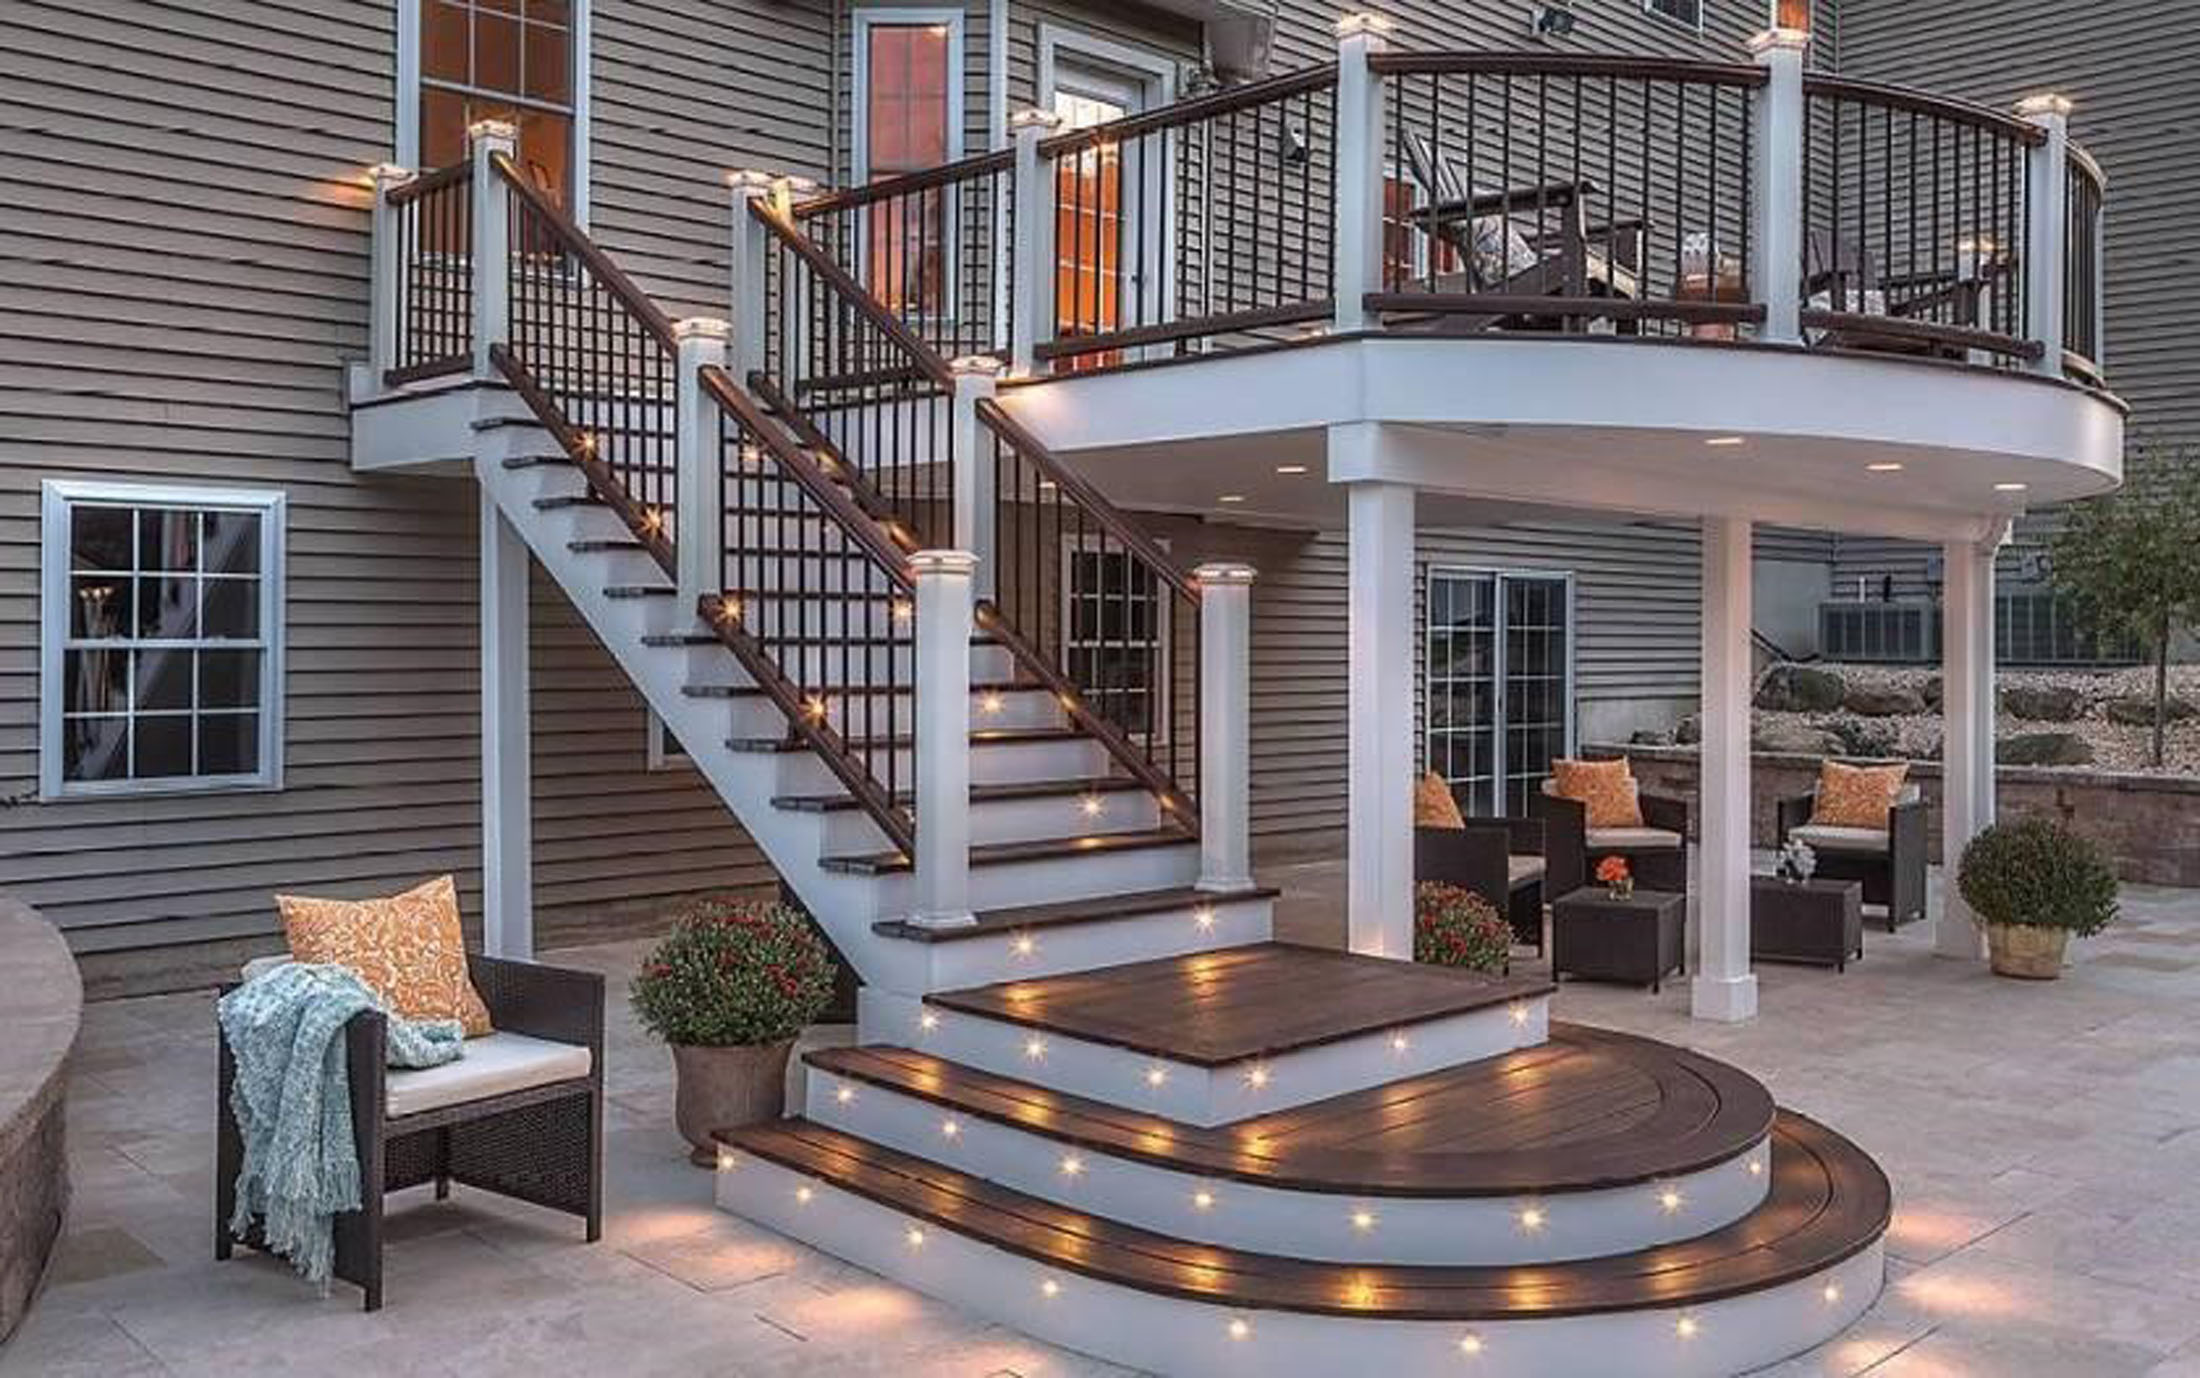
A good example is a 12-step backyard stair from a raised deck to a paver patio. You may not need a light on every riser. Lights on alternating risers, plus a landing fixture, can read better than a row of tiny airport runway dots. Spacing beats repetition.
When solar, battery, and hardwired options fit
Solar stair lights sound easy, and sometimes they are. They work best on open stairs that get steady sun and do not serve as the home’s main nighttime route. For a side-yard stair shaded by a fence, tree canopy, or north-facing wall, solar can fade exactly when you need it.
Battery fixtures are better for short-term fixes, rentals, or places where drilling is not allowed. They can help near a shed stair or a back porch step. The catch is maintenance. Batteries die. Adhesive loosens. Motion sensors get confused by pets, branches, and winter cold.
Hardwired fixtures cost more upfront, yet they give the cleanest result for a main entry stair. A licensed electrician can route wiring safely, protect connections from water, and keep the finished look tidy. That matters on brick, stucco, stone, and composite decking where a sloppy hole is hard to hide later.
Planning the Wiring Before You Drill
Most lighting mistakes happen before the first fixture goes up. A homeowner buys six lights, guesses at spacing, drills the first hole, and then discovers the wire path crosses a downspout, a stair stringer, or a buried irrigation line. Planning feels slower, but it prevents ugly repairs. It also gives you better control over cost.
Why deck stair lighting needs a dry path
Deck stair lighting has one enemy that hides in plain sight: trapped water. A wire hole drilled flat into a riser can collect moisture. A fixture placed where snow piles against the step can corrode early. A junction tucked under a stair can stay damp for weeks after a storm.
Give water a way out. Place fixtures where they shed rain, not where they catch it. Use outdoor-rated cable, gaskets, connectors, and boxes. Leave enough service loop to repair a fixture later without tearing apart half the stair.
Think about a typical pressure-treated deck in Ohio or Pennsylvania. The stair may look dry in June, then spend January covered in slush and road salt tracked from boots. The fixture that survives there is not the thinnest one. It is the one with a protected lens, firm mounting, and a wiring path that does not sit in wet wood.
What to check before trenching or cutting
Call 811 before digging for buried cable, even if the trench looks shallow. The national 811 system exists so utility lines can be marked before a homeowner or contractor cuts into soil. A lighting project is not worth a gas-line scare or a severed internet line.
Before cutting into walls, risers, or masonry, mark every fixture with painter’s tape and visit the stairs after sunset. Turn on a temporary work light from the angle you expect each fixture to shine. This low-tech test catches bad placement fast.
Also check the circuit load, transformer capacity, voltage drop on long runs, and switch location. A timer, photocell, or motion sensor can make the system easier to live with, but controls should not create surprise darkness while someone is already on the stairs. Safety lighting should feel predictable.
Creating Evening Ambiance Without Overlighting
After safety and wiring are handled, the fun part begins. Evening ambiance is not about flooding the staircase with light. It is about making the space feel settled. The staircase should invite movement, frame the patio, and connect the house to the yard. If the light calls attention to itself first, it is probably too strong.
How warm light changes the mood
Warm light makes outdoor stairs feel calmer because it sits closer to porch lanterns, fire pits, and interior window glow. Many homeowners like the 2700K to 3000K range for residential outdoor spaces because it feels welcoming without turning orange. Cooler light can work near a crisp modern entry, but it often feels harsh on wood, brick, and planting beds.
This is where restraint pays off. A stone stair with six small recessed lights can look expensive at low brightness and cheap at high brightness. The fixture did not change. The output did.
Use dimming when the system allows it. Set the lights for walking, then back them down a little once the stair edges still read. The best evening stair lighting often looks slightly underdone in photos and far better in person.
How to blend path, wall, and step lighting
A stair does not live alone. It connects to a path, deck, porch, driveway, garden, or patio. If each zone has a different color, brightness, and fixture style, the eye feels jumpy. The space may be safe, but it will not feel calm.
Blend the layers. Use deck stair lighting for the steps, a soft path light at the bottom, and a wall sconce near the door. Keep the color temperature close. Let one fixture type lead and the others support it.
A non-obvious trick is to light the arrival points more than the middle. The top landing and lower landing need confidence. The middle steps only need enough glow to keep rhythm. That keeps the stair safe while preserving the darker edges of the yard, where plants, fences, and stonework hold their shape.
Conclusion
Good outdoor stair lighting is not about showing off fixtures. It is about removing doubt from each step while keeping the evening soft enough to enjoy. Start by watching how people move through the space, then decide where light should land, where wiring can stay protected, and which controls will make the system easy to use. That is the quiet win of staircase lighting installation: the stairs look better because they work better. You do not need a bright line on every riser or a smart feature on every switch. You need a calm path, weather-ready parts, and enough restraint to let the yard still feel like night. Before buying fixtures, sketch the stair, mark the landing points, and walk the route after dark. Build the lighting around that real experience, and the finished stairs will feel safer the first night they turn on.
Frequently Asked Questions
How much does outdoor stair lighting cost for a typical home?
Costs vary by fixture type, wiring access, and labor rates. A small low-voltage project may cost a few hundred dollars in materials, while hardwired masonry or deck work can run higher. Labor often becomes the main cost when drilling, trenching, or electrical upgrades are needed.
What is the best light color for outdoor steps?
Warm white usually works best for homes, especially around wood, brick, stone, and patios. Many homeowners prefer 2700K to 3000K because it marks the steps without making the yard feel harsh. Cooler light can fit some modern entries but needs careful dimming.
Are solar lights safe enough for exterior stairs?
Solar lights can help on secondary stairs with strong sun exposure, but they are not ideal for a main route that people use nightly. Shade, cloudy weather, dirty panels, and aging batteries can reduce output. For key stairs, wired lighting is usually more dependable.
Should every stair tread have its own light?
No. Lighting every tread can look busy and may create glare if fixtures are too bright. Many stairs work better with lights on alternating risers, side walls, posts, or landings. The goal is clear step edges, not a fixture count.
Can I install low voltage step lights myself?
Some homeowners can handle simple low-voltage kits, but outdoor electrical work still needs care. Use rated parts, protect connections, follow local rules, and call 811 before digging. Hire an electrician if the project needs new outlets, hardwired controls, or panel work.
Where should lights be placed on deck stairs?
Common placements include risers, side stringers, rail posts, and nearby walls. Keep fixtures low enough to show the tread edge but shielded enough to avoid glare. Test the layout at night with temporary light before drilling finished decking or railing parts.
Do outdoor stair lights need a timer or motion sensor?
A timer, photocell, or motion sensor can reduce wasted energy and make the lights easier to manage. For stairs, avoid settings that shut off too quickly. People should never be left in darkness halfway through the stair run.
What is the biggest mistake with outdoor stair lighting?
Overlighting is the mistake that causes the most regret. Bright fixtures can flatten the stair, create glare, and ruin the evening mood. A softer, shielded layout usually feels safer and more polished than a row of exposed lights.